-
Survival Gardening: Duckweed

Growing duckweed can be a straightforward and rewarding process. Duckweed is a small aquatic plant that grows quickly and can be an excellent addition to ponds, aquariums, or even small containers. It doubles every day when the weather is warm and is the perfect food for poultry, purifies water, and shades ponds and water storage.
I grow duckweed to shade water in storage and clean water while generating biomass. It is a great treat for my quail which can provide fresh natural plants and quail cant free-range. It grows fast and is extremely palatable. It cay be dried for storage and survives freezing temperatures. Here’s a basic system to grow duckweed:

Materials Needed:
- Container or Pond:
- Choose a container, pond, or tank to grow duckweed. It can be a small container for indoor growth or a larger pond for outdoor cultivation.
- Water Source:
- Use clean, non-chlorinated water. If you’re using tap water, let it sit for 24 hours to allow chlorine to dissipate.
- Duckweed Starter Culture:
- Obtain duckweed from a reliable source to start your culture. Duckweed can be found in natural water bodies or purchased from suppliers.
- Sunlight:
- Duckweed thrives in sunlight. Place the container or pond in a location where it receives ample sunlight. If growing indoors, consider using artificial lights.
- Temperature:
- Duckweed prefers warm temperatures. Keep the water temperature between 50°F to 95°F (10°C to 35°C).
- Nutrient Source:
- Duckweed can extract nutrients from the water, but you can enhance growth by adding organic matter or a mild fertilizer. Fish waste or compost can provide nutrients.
- Aeration (Optional):
- While duckweed generally doesn’t require aeration, providing gentle water movement can help prevent stagnation and promote nutrient distribution.
Steps:
- Prepare the Container:
- Fill the container with clean water. If using tap water, let it sit to allow chlorine to dissipate.
- Add Duckweed:
- Introduce the duckweed starter culture into the water. Spread it evenly on the surface.
- Provide Sunlight:
- Place the container or pond in a location where it receives plenty of sunlight. If growing indoors, consider placing it near a window or using grow lights.
- Nutrient Management:
- Monitor nutrient levels. If needed, add organic matter or a mild fertilizer to enhance growth.
- Harvesting:
- Duckweed grows quickly. Harvest it regularly using a fine mesh net. Harvesting helps control growth and provides you with a nutrient-rich plant for various uses.
- Maintenance:
- Keep an eye on water quality, temperature, and overall health of the duckweed. Remove any debris or excess organic matter.
By following these steps, you can create a simple and effective system to grow duckweed. Duckweed is not only a valuable feed for livestock and fish but also serves as a natural water purifier.
- Container or Pond:
-
From Sorrow to Bounty: My Journey as a Beekeeper in 2023.

Beekeeping has been my passion and source of joy for years. As a beekeeper, I have witnessed the ebb and flow of honeybee colonies, experiencing both the highs of abundant harvests and the lows of heartbreaking swarming and winter wipeouts. In this challenging season, after the devastating loss of all but one of my my hives over winter, my preciouses overwintered hive swarmed taking my priceless survivor queen and leaving me with a mix of sorrow and decimation. Little did I know that this setback would ultimately lead me to turn sorrow into bounty, as I embarked on a journey of splitting the swarm cells and creating new hives from the remnants.
The Heartbreak of Swarming
I couldn’t wait for Spring to arrive with the sense of anticipation, as I eagerly await the resurgence of my thriving overwintered hives. For the past 12 years these hives had consistently provided me with an abundance of bees and honey and had become my pride and joy. However, fate had a different plan in store for me. After all the work of putting my hives to sleep for winter, including feeding, treating, wrapping, and sheltering, the weather destroyed my plans by attacking with three solid weeks of blasting cold. In my Febuary 1 hive check, heartbreak upon heartbreak as hive after hive was found frozen solid in the cluster. The bees had no chance against three solid weeks of 40 mile per hour NW winds and -30 degree F. WHY didn’t I bring them inside? Can I forgive myself?
After checking over 20 hives with the same result, I just gave up-it was hopeless! Everything was dead. On the first warm day, I tentatively traveled to the bee yard hoping against hope for some glimmer of life. Nothing, no bees from any hive, I was devastated-my worst fear came true. What should I do, buy more hives or sell my hives? After a couple weeks and another worm sunny day it was time to gather the hives, clean them out, and store them away. Sure I saw a few odd bees flying around but assumed it was just someone else who had bees survive just cleaning up all the left over honey stores in my dead hives. After three days of cleaning and stacking, I was amazed to see a tiny seam of bees looking at me from the middle of a box. Could it be? Something alive? Was there a queen? YES one surviving tiny little cluster.
I immediately moved this pathetic little family from their graveyard of dead sisters and gave them a clean fresh nuc with the queen and the few surviving bees and a frame of pollen and three frames of honey. I was hoping against hope that these pathetic survivors could persevere! I kept them in the house at night and during bad weather, only putting them out on warm sunny days. When they ate their honey and pollen I gave them more-and soon they were ready to explode out of their five frames and needed more space.
I moved them into an 8 frame deep and in three days they were ready for more space. I then gave them a medium super of honey and empty comb, and then again the weather crashed. After 5 days with highs in the 20’s, when it finally warmed up again I was so sad to see half the brood chilled and dead. Crushed, I removed the super and put them back in the nuc, and back in the house. I was NOT going to loose these bees! After a couple weeks they were built back up, back to the 8 frame, and two deeps this time with the honey on top. I was excited for Mid-may and drones so I could begin raising queens from my little pets.
One warm afternoon in early May, as I tended to my many chores, I heard the telltale sounds of swarming. My heart sank as I realized that my beloved hive was abandoning me and the only home they had ever known. Worse, my hopes of queen rearing from the survivor were over for the season.
Witnessing swarming, while a natural process for honeybees, always evokes a mix of emotions for beekeepers. On one hand, it signifies the vitality and strength of the colony, but on the other, it can be disheartening, leaving us fearing the loss of a robust hive and a loss of chances of honey production. The exhilaration of catching a thriving swarm is directly reversed to the defeat of self doubt, wondering why I didn’t do more to ensure this wouldn’t happen.
Turning Sorrow into Opportunity
Determined not to let sorrow consume me, I knew I had to act swiftly. Instead of allowing the hive genetics to depart entirely, I decided to take a bold step and split the swarm cells. As I did not know exactly what day each cell was capped, this meant being extra careful separating the queen cells from the multiple combs of the brood nest of the hive, hoping to create the potential for new colonies to thrive.
With my gloves no where to be found and no time to get the smoker going, I delicately divided the queen cells into six groups, each destined to become the heart of a new hive. I ensured that each split had sufficient worker bees and ample food stores to guarantee a solid foundation for these emerging colonies.
Eight splits, Six Opportunities
Over the following weeks, I tended to my newly split colonies with utmost care and dedication. It was a labor of love as I watched each hive grow, their population expanding, and their foragers diligently collecting nectar and pollen. Once the queens emerged, I was devastated to see the first queen had one shriveled wing. She would never be able to fly free and find the mates she will need to head her own hive some day. The second hive was also a sad discovery, there were no hatched cells, they seemed dead and must have been chilled-I remembered the top had blown off this nuc for a few hours after the split, so I was kicking myself thinking things were not looking good and had I damaged or killed all my chances for replacing, much less expanding, my hives. Thankfully, the final six splits had hatched a perfectly beautiful healthy virgin queen, flown out and found mates, and returned to lay bountiful numbers of tiny eggs. What was once a sorrowful swarming event had miraculously transformed into a bountiful harvest of opportunities.
As the vibrant days of summer arrived, my six new hives thrived beyond my wildest expectations. The queens were strong, and the worker bees displayed exceptional resilience. The air buzzed with the symphony of their wings as they diligently went about their pollination duties. The blooming flowers of all the Amish farms in my area provided all the abundance the bees needed to fill each nuc with baby brood they would need if we ever get some rain.
A New Chapter: Sharing the Bounty
With an abundance of honey and beeswax now at my disposal, I found myself at a crossroads. Instead of hoarding the bounty for myself, I recognized an opportunity to share this wealth with others in the beekeeping community. I decided to offer the surplus nucs for sale, enabling new enthusiasts to embark on their own beekeeping journeys while also ensuring the well-being of the new colonies by allowing them to spread out to new areas and reach their fullest potential. If there were ever a year for this to happen, however, this is a good year. After selling almost 400 queens during 2022, this year is looking very bad for the local survivor queen making business. Most keepers in my area lost 75-100% of their bees and I didn’t fair much better. Since I am not in it for the honey, however, I would usually plan on making as many post-solstice queens as I could right now. Strangely, however, due to all the losses of honey bees in this area, the market for queens is flat, since fewer hives are alive and needing re-queening. In fact, the major queen breeders are overwhelmed with banked queens and are placing them on sale at rock bottom prices I haven’t seen in ten years! Competing with these prices would be impossible and it’s just as well I don’t have the capability to make queens this year.
Lessons Learned and Future Aspirations
My journey from sorrow to bounty has taught me valuable lessons about checking the entire brood nest often, and not assume that bees can’t swarm early in the year, or will not swarm if the queen has space. Although this time I was able to turn this setback into a less than total loss, I have lost the opportunity to make a season worth of new queens from this valuable survivor queen, who was able to succeed where 43 others had failed. Already, the new hives are rebounding and filling their 8 frame equipment right to the brim, and already requiring more space. They have even started to make a little bit of honey since we finally got some much needed rain. 8 frame boxes allow amazing buildup, and the three hives I have in 8 frame now you would never know they were from a split. The queens I mated in 5 frames have already needed honey removed so the queen had room to lay. The colonies in 10 frame boxes, however, and struggling to catch up and are needing weekly supplements to even stay even. They are struggling to even get to 4 frames of bees where as the smaller hives are booming. I feel it’s time to either sell these hives to someone who can use them to re-queen a big hive, or purchase more 8 frame hives to see what difference that might make.

-
A Comparative Analysis: Growing Duckweed vs. Microgreens for Nutritional Benefits and Sustainability

Introduction:
As the demand for fresh and nutrient-dense foods continues to rise, alternative farming methods such as growing duckweed and microgreens have gained popularity. Both duckweed and microgreens offer unique advantages in terms of nutrition and sustainability. This article provides a comparative analysis of growing duckweed and microgreens, examining their nutritional benefits, cultivation requirements, and environmental impacts. By understanding the differences between these two approaches, individuals can make informed decisions about incorporating them into their diets or farming practices.
- Nutritional Benefits:
Duckweed and microgreens both offer exceptional nutritional profiles, albeit with some variations. Duckweed, despite its small size, is rich in protein, vitamins, minerals, and essential amino acids. It contains a high concentration of nutrients, making it an excellent source of plant-based protein. On the other hand, microgreens are young vegetable greens harvested at an early stage, providing concentrated amounts of vitamins, minerals, and antioxidants. While microgreens generally have lower protein content than duckweed, they offer a broader range of phytonutrients and are known for their flavor and culinary versatility.

- Cultivation Requirements:
Duckweed cultivation requires a water-based environment, such as ponds, tanks, or specially designed systems. It thrives in nutrient-rich water and can grow rapidly under favorable conditions. Duckweed requires minimal space, making it suitable for both large-scale and small-scale farming operations. Conversely, microgreens are typically grown in soil or hydroponic systems. They require adequate light, water, and proper temperature control to ensure optimal growth. Microgreens can be grown in trays or containers, making them adaptable to various indoor and outdoor settings.

- Environmental Impact:
In terms of environmental impact, both duckweed and microgreens offer sustainability benefits. Duckweed cultivation has the potential to purify water bodies by absorbing excess nutrients, reducing water pollution. It also requires fewer resources, such as land and water, compared to traditional crop cultivation. Additionally, duckweed has a high growth rate, allowing for efficient biomass production. Microgreens, on the other hand, have a relatively small environmental footprint due to their short growth cycle and the ability to grow them indoors, reducing the need for extensive land use. However, microgreens may require more energy input for indoor lighting and climate control.

- Versatility and Culinary Applications:
Both duckweed and microgreens offer versatility in culinary applications. Duckweed can be consumed fresh or processed into various forms, such as dried flakes or powder. It can be incorporated into smoothies, salads, soups, or used as an animal feed supplement. Microgreens are often used as garnishes, added to salads, sandwiches, or used to enhance the visual appeal and flavor of various dishes. The vibrant colors, delicate textures, and concentrated flavors of microgreens make them popular in fine dining and gourmet cuisine.

- Continuous Production and Seed Requirement:
One notable difference between growing duckweed and microgreens is the aspect of continuous production and seed requirement. Duckweed has a unique advantage of continuous growth, meaning that once established, it can proliferate rapidly, providing a continuous supply of fresh biomass without the need for seeds. This makes duckweed an efficient and sustainable feed source for animals or a readily available ingredient for human consumption. On the other hand, microgreens require seeds for cultivation. The seeds need to be purchased or sourced and sown to initiate the growing process. While microgreens have a relatively short growth cycle, typically ranging from one to three weeks, each new batch requires the procurement of fresh seeds for continuous production. This seed requirement adds an additional step and cost to the cultivation process compared to the continuous growth of duckweed. It’s important to note that once microgreens are harvested, the cycle restarts with new seeds, whereas duckweed can continue to propagate without the need for frequent seed purchase or resowing.
Conclusion:
In the comparison between growing duckweed and microgreens, it’s important to consider the aspect of continuous production and seed requirement. Duckweed offers the advantage of continuous growth, providing a constant supply of biomass without the need for frequent seed purchase or resowing. Conversely, microgreens require the procurement of seeds for each new batch, adding an additional step and cost to the cultivation process. Considering this aspect can help individuals and farmers make informed decisions based on their specific requirements and preferences for sustained production and cost-effectiveness.
Growing duckweed and microgreens present unique opportunities for individuals and farmers seeking nutrient-dense and sustainable food options. While duckweed offers a protein-rich and rapidly growing aquatic plant suitable for water purification and animal feed, microgreens provide concentrated nutritional benefits and culinary versatility. The choice between duckweed and microgreens ultimately depends on specific preferences, cultivation capabilities, and intended applications. By considering the nutritional benefits, cultivation requirements, and environmental impacts of both options, individuals can make informed decisions that align with their dietary needs and sustainable farming practices.
If we ever attempt to colonize space, duckweed would be a viable source of self sustaining food, recycler of waste, and water purifier. Although it is currently not accepted as a human food, it actually is very similar to alfalfa sprouts in texture and nutritional profile. It can be grown in shallow water pans and does not require the complex watering systems needed for microgreens. Also, it is not susceptible to mold as can destroy microgreen setups. The main advantage, however, is that once the system is seeded with live plants production is continuous as opposed to microgreens which require the continuous purchase of viable seed in large quantity, ways to clean the seed, and work in planting, watering, and rotating the trays, and even harvesting can be a challenge. Duckweed growing offers the real possibility to completely automate the system and does not produce the large quantity of root mat waste.
-
Duckweed: A must for the self sufficient farmer.

Cultivation of Duckweed offers a nutritious feed solution for chickens, quail, ducks, and rabbits. We cultivate a five species mix of duckweed species which allow for continuous production of high biomass conversion of organic nutrients into an invaluable feed source for your animals through the entire growing season. This offers the perfect solution to feeding your animals on a very high protein feed at no cost.
In recent years, the concept of sustainable and efficient animal farming has gained significant attention. One innovative solution to address the nutritional needs of poultry and small animals such as quail, ducks, and rabbits is the cultivation of duckweed. Duckweed is a tiny aquatic plant which offers a multitude of benefits as a feed source, including its rapid growth, high protein content, and minimal environmental impact. This offers advantages with ease of growing duckweed as a nutritious feed option for chickens, quails, ducks, and rabbits, highlighting its potential to revolutionize animal farming practices.
- Fast and Efficient Growth:
Duckweed is renowned for its exceptional growth rate. Under favorable conditions, it can double its biomass within just a couple of days. This characteristic makes it a highly efficient feed source, ensuring a consistent supply of fresh food for animals throughout the year. Compared to traditional feed crops, duckweed requires less land, water, and time to produce an abundant biomass.
- High Nutritional Value:
Despite its small size, duckweed packs a powerful nutritional punch. It is rich in protein, containing up to 40% protein content on a dry weight basis, making it an excellent protein source for poultry and small animals. In addition to protein, duckweed is also a good source of vitamins, minerals, and essential amino acids, promoting healthy growth and development in the animals consuming it.
- Environmental Sustainability:
Duckweed cultivation offers numerous environmental benefits. Its ability to thrive in nutrient-rich water, including wastewater and animal manure, provides an opportunity to recycle these resources effectively. By harnessing duckweed’s capacity to absorb nutrients, animal farmers can reduce water pollution and enhance the sustainability of their operations. Furthermore, duckweed cultivation produces minimal greenhouse gas emissions, making it an environmentally friendly alternative to conventional feed crops.
- Cost-Effective Feed Option:
The affordability of animal feed plays a crucial role in the profitability of farming operations. Duckweed cultivation presents a cost-effective solution, as its production costs are significantly lower compared to traditional feed crops. By reducing reliance on expensive feed ingredients, farmers can improve their overall cost-efficiency while still providing their animals with a highly nutritious diet.
- Versatile Feeding Options:
Duckweed can be incorporated into animal diets in various ways. It can be fed directly to chickens, quails, ducks, and rabbits or used as a supplement to their existing feed. Duckweed can also be dried and processed into pellets or flakes, extending its shelf life and enabling convenient storage and transportation. This versatility makes duckweed an adaptable feed option that can be tailored to meet the specific nutritional requirements of different animal species.
Conclusion:
The cultivation of duckweed as a feed source for chickens, quails, ducks, and rabbits offers a sustainable and nutritious alternative to traditional feed crops. Its rapid growth, high protein content, and minimal environmental impact make it an attractive option for animal farmers seeking to optimize their operations. By harnessing the potential of duckweed, farmers can reduce costs, enhance animal nutrition, and contribute to a more environmentally sustainable approach to animal farming. Embracing this innovative solution has the potential to revolutionize the way we feed our poultry and small animals, paving the way for a more efficient and responsible agricultural industry.

Duckweed Cultivation: A Dual Solution for Water Purification and Manure Utilization in Animal Farming
Introduction:
Duckweed cultivation not only provides a nutritious feed source for animals but also offers additional benefits in terms of water purification and manure utilization. This article explores how growing duckweed can serve as a dual solution, effectively addressing the challenges of water pollution caused by agricultural runoff and optimizing the management of animal manure in farming operations. By harnessing the unique capabilities of duckweed, farmers can mitigate environmental impacts while improving the overall sustainability of their practices.
- Water Purification:
Duckweed has remarkable abilities to remove pollutants and purify water. It efficiently absorbs excess nutrients such as nitrogen and phosphorus from water bodies, which are major contributors to water pollution. By cultivating duckweed in ponds or specially designed water treatment systems, farmers can utilize these plants as natural filters, preventing nutrient runoff and minimizing the risk of eutrophication. This approach not only helps maintain the ecological balance of water bodies but also reduces the need for chemical treatments.
- Nutrient Cycling and Manure Utilization:
Animal manure presents a significant challenge in terms of proper disposal and its potential to contribute to water pollution. However, duckweed cultivation provides an innovative solution for managing manure effectively. By integrating duckweed ponds or floating systems into animal farming operations, farmers can utilize the nutrient-rich manure as a fertilizer for the growth of duckweed. The duckweed plants absorb and utilize the nutrients present in the manure, minimizing the risk of nutrient leaching and creating a closed-loop system that promotes sustainable nutrient cycling.
- Reduction of Greenhouse Gas Emissions:
Improper management of animal manure can lead to the release of greenhouse gases such as methane and nitrous oxide, which contribute to climate change. By implementing duckweed cultivation as a means of manure utilization, farmers can significantly reduce these emissions. Duckweed’s ability to capture and store nutrients from manure prevents their conversion into greenhouse gases, thereby mitigating the environmental impact associated with manure management.
- Cost Savings and Resource Efficiency:
Incorporating duckweed cultivation into water purification and manure management strategies can result in cost savings and improved resource efficiency for farmers. By using duckweed to naturally filter water bodies, farmers can reduce the need for expensive chemical treatments and comply with environmental regulations. Furthermore, the integration of duckweed ponds or systems for manure utilization eliminates the need for additional fertilizers and reduces reliance on external nutrient sources, contributing to cost savings and improved overall efficiency.
- Potential for Integrated Farming Systems:
The use of duckweed cultivation for water purification and manure utilization opens the door to integrated farming systems. These systems involve the symbiotic relationship between livestock and plant production, creating a harmonious cycle of resource utilization. By combining animal farming with duckweed cultivation, farmers can maximize resource efficiency, reduce waste, and create a more sustainable and interconnected agricultural system.
Conclusion:
Duckweed cultivation offers a dual solution for water purification and manure utilization in animal farming. By harnessing the unique abilities of duckweed, farmers can mitigate water pollution, optimize nutrient cycling, and reduce greenhouse gas emissions. Implementing duckweed cultivation as part of integrated farming systems can lead to cost savings, improved resource efficiency, and a more sustainable approach to agriculture. By embracing this innovative solution, farmers can not only improve the environmental sustainability of their operations but also contribute to the preservation of water quality and the reduction of nutrient pollution.
-
A Guide to Growing Morel Mushrooms: Cultivating a Culinary Delight


Subscribe to continue reading
Subscribe to get access to the rest of this post and other subscriber-only content.
-
May is Beekeeping Month!

Spring is a busy season for beekeepers, as it is the time when bees swarm and search for a new home. While this can be an exciting time for experienced beekeepers, it can also be a challenge for those who are new to the hobby. Many beekeepers, new and old, excitedly purchase package bees from the Southern states, as well as nuc’s and splits from southern as well as overwintered hives. Since supplies are limited, prices of all these options continuously goes up. Bee keeping equipment prices also continue to skyrocket. After laying out so much cash, it can be extremely heartbreaking and pocketbook breaking when your bees abscond.
It is estimated that only around 50% of swarms will stay in a new hive, with the rest absconding to find a different home. This can be due to a variety of factors, such as the location of the hive, the health of the bees, or the availability of resources in the area. It can also be a factor of the bees not liking the feel or smell of brand new equipment with only foundation and no drawn comb. Also, they may not like the queen they were given in the package making process, or she has not been allowed to mate or lay enough to build her pheromone level enough to hold the hive.
If you purchased bees, it is very intelligent to place one or more clean used hives in the vicinity of your own bees. This way you can hopefully recover your own bees and swarms. This will hopefully reduce your own losses, as well as adding the possibility of adding to your apiary for free.
In the late Spring, catching absconded packages of bees and swarms is a common occurrence, and one way to do this is by putting out a used hive with drawn comb that is not diseased but just froze out. The hive should be positioned in a location that is easy for the bees to find and access. This means placing it in an open area, away from trees and other obstructions. It should also be positioned at a height that is comfortable for the beekeeper to work with. The drawn comb with the bee smells will draw activity of scout bees.
When a swarm of bees is on the move, they are looking for a new home, and it is difficult if not impossible to stop them.. They will be looking for the spot marked by scout bees which could be a tree, a building, or even a car. Beekeepers can take advantage of this by putting out a used hive with drawn comb in a location where they have seen swarms before. The drawn comb is important because it provides a home for the bees and a place to store their honey and pollen. Adding lemongrass oil can act as a great swarm lure as it mimics the smell of a queen.
A small hive or nuc is often hung in a tree as a bait hive, however it is important to check the bait hive regularly for signs of activity. This can be done by simply observing the hive from a distance or by opening it up to inspect the frames. If there are bees inside, it is important to take steps to transfer them to a more permanent location, such as a new hive in the beekeeper’s yard.
In addition to providing a home for swarms and absconded packages of bees, using a used hive with drawn comb can also be cost-effective for beekeepers. Purchasing a new package of bees can cost upwards of $100, depending on the supplier and the number of bees included in the package. In contrast, a used hive with drawn comb can be a much more affordable option.
Despite the risk of absconding, using a used hive with drawn comb can still be a valuable tool for beekeepers in Minnesota. By taking steps to ensure that the hive is clean and free of disease, beekeepers can increase the likelihood of attracting and keeping a swarm or absconded package. Additionally, even if a swarm does not stay in the hive, it can still provide valuable experience for the beekeeper in catching and working with bees.
In conclusion, catching absconded packages of bees and swarms in Minnesota can be a rewarding experience for beekeepers. By putting out a used hive with drawn comb that is clean and disease-free, beekeepers can provide a new home for bees while also saving money. While there is a risk of absconding, the benefits of catching and keeping a swarm can far outweigh the potential drawbacks. With patience, persistence, and a little bit of luck, beekeepers can successfully catch and keep swarms and absconded packages of bees in their apiary.

-
Cage Assembly

I purchase a lot of used cages and buy out rabbitries that are getting out of rabbits, and I find the biggest reason for adults to be getting rid of rabbits is health problems caused by their caging systems. The largest reason for youth breeders is obviously graduating and moving on with their life. If you planning on building your own cages PLEASE read through to the end to avoid the most common mistakes!
Making a rabbit hutch type cage
Assembling a rabbit cage can be a relatively simple task, but it is important to follow the instructions carefully to ensure that the cage is sturdy, safe, and comfortable for the rabbits. In this article, we will provide a general overview of the assembly process for rabbit cages, along with some tips and considerations to keep in mind.
Step 1: Gather Tools and Materials Before starting the assembly process, it is important to gather all the necessary tools and materials. These may include:
- Rabbit cage kit or components
- Screws, nuts, bolts, and other fasteners
- Screwdriver, pliers, or other tools as required
- Protective gloves and eyewear
- Instruction manual or assembly guide
Step 2: Prepare the Site Choose a suitable location for the rabbit cage, such as a dry, level, and well-ventilated area that is protected from the elements and predators. Clear the site of any debris or obstacles that could pose a hazard to the rabbits, and ensure that there is enough space to move around and access the cage.
Step 3: Follow the Instructions Carefully read and follow the instructions provided with the rabbit cage kit or components. These may include step-by-step diagrams, written instructions, or video tutorials. Make sure to assemble the cage in the correct order, and use the recommended fasteners and tools.
Step 4: Check for Sturdiness and Safety Once the rabbit cage is fully assembled, check to ensure that it is sturdy and safe for the rabbits. Test the stability of the cage by gently pushing and pulling it from different angles, and make any necessary adjustments to the fasteners or supports. Check for any sharp edges, loose wires, or other hazards that could cause injury to the rabbits, and address them as needed.
Step 5: Add Accessories and Bedding After the cage is assembled and secured, it is time to add accessories and bedding to make it comfortable and functional for the rabbits. These may include water bottles, food bowls, hay racks, litter boxes, toys, and other items. Choose accessories that are appropriate for the rabbits’ size, breed, and habits, and ensure that they are securely attached to the cage.
Step 6: Monitor and Maintain the Cage Regularly monitor the rabbit cage for signs of wear and tear, damage, or hazards, and address them as soon as possible to prevent injury or escape. Clean and disinfect the cage and accessories regularly to maintain a healthy and hygienic environment for the rabbits.
In conclusion, assembling a rabbit cage requires careful attention to detail and adherence to the instructions provided. By following these steps and considering the rabbits’ needs and safety, you can create a comfortable and secure home for your furry friends.
Making an All Wire Cage
Consideration for building an all wire cage is how your rabbits will be sheltered? What size cage do I need? What materials are available? How long do these cages need to last? How will I feed and water my rabbits? How do I build the cage? What tools do I need? Next, we will attempt to answer these questions and more!
Shelter
Main considerations are protecting your rabbits from wind, rain, and sun. Secondary considerations are the removal of urine, waste, hair, and stale air. These are not small considerations, however, because rabbits poop A LOT!!!!!! Priority three is protection from predator’s, as well as how your going to raise your litters.
Do you have a small outbuilding, existing barn, or carport shelter? If so these make the best options for hanging or stacking your all wire cages. Remember HEAT is the biggest killer of rabbits! If you have a small building it needs to have large windows and doors to provide adequate ventilation. If your keeping your rabbits in a garage or carport the same applies. I portable shelter can be a great option for housing rabbit cages because it can be easily moved and keeps the animals dry. A greenhouse is a great solution as well, but only in the dead of winter, summer and shoulder seasons are not good because a warm day can literally fry your rabbits.
Even if you don’t have any type of shelter, the best thing about rabbits is they can be housed in the simplest of housing! If you purchase an all wire cage that is strong and sturdy, you can make a simple cage shelter from a few pallets. These pallets can often be sourced free or cheap in your area no matter where you are. I made a very nice shelter with 4 pallets that have served perfectly for a weaning cage. Materials include 4 matching pallets 36 inches by 48 inches or larger. 2 rubber bungee straps, shortest are fine. Cage 36″ x 30″ x 18″. 11 inch J feeder with screened bottom and cover. Nipple water, 4 feet of clear 5/8 inch ID clear tubing, any 5 gallon container (food grade) to hold water. OPTIONAL: Large concrete mixing tub to collect the valuable manure.

https://bassequipment.com/ is an excellent source for high quality proper caging systems. 
Nipple watering and J feeders are the most import method for saving you time, reducing waste, and ensuring your rabbits have the clean dry feed and clean cool water they need at all times! Hang the feeders and waterers HIGH in the cage. They should have to reach for the food and water or they will sit in the feed and spoil it. They can also lay against the water and drain your tank.
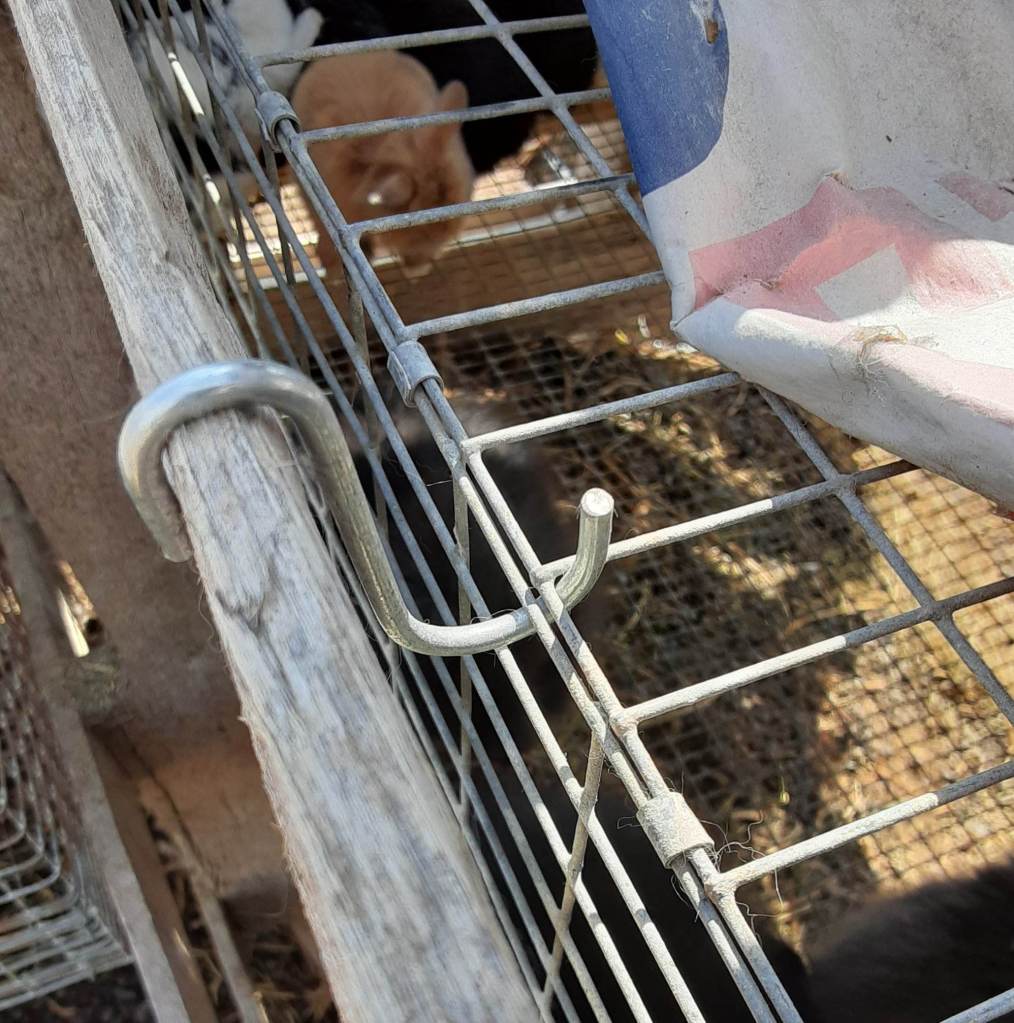
Hooks from bungee hold cage and pallets together. You need at least 4, two back and one each side. The rubber part can be wired together around the base to hold pallets together. 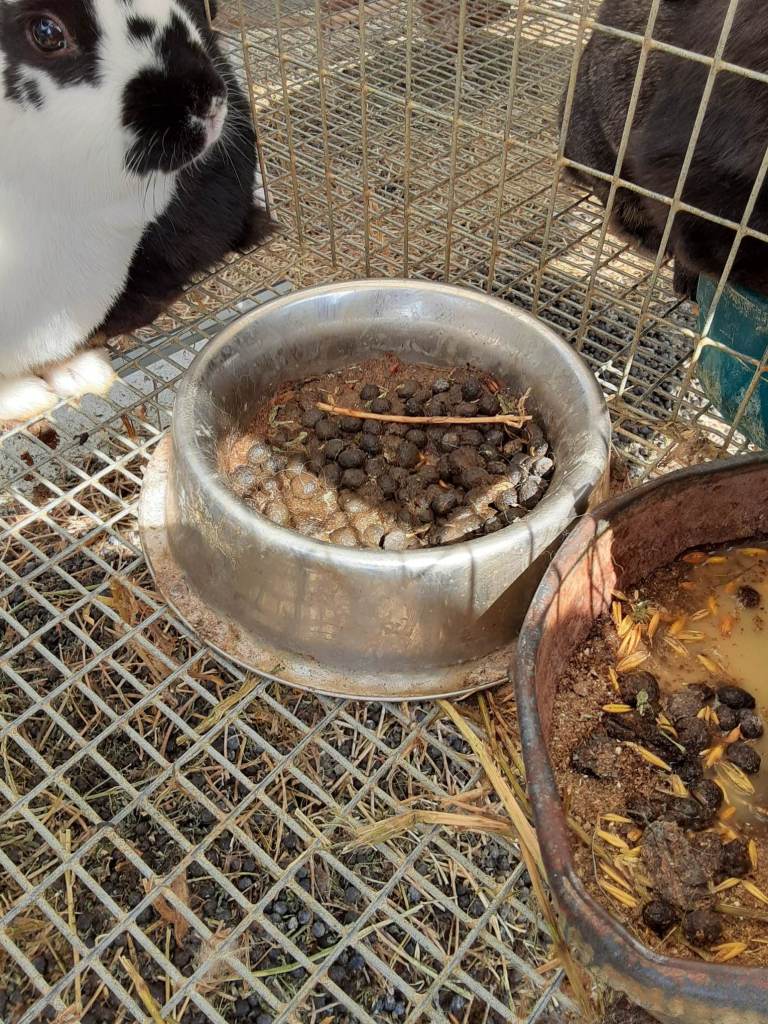
Crock watering is a crock of S!@T! Rabbits will soil and/or spill constantly! Skip the crocks! They just will not behave! 
Feed grade container for water, the larger the better. Adding cool water in the morning and this opaque 5 gallon container can stay cool all day. Adding warm water in winter keeps the water thawed for several hours as long as they keep drinking the hose will stay open. 
Shade cloth cover is cheap, light, airy, and blocks the sun and rain. Great for keeping the rabbits cool. The best thing about this cage is it can be set up and taken down quickly, moved, sold, or stored away. It is sturdy, provides shelter, and provides perfect visibility and access to your rabbits and to clean. With the optional concrete tub, the waste can be quickly and easily removed and dumped in your yard or garden. You don’t need to screw the shelter together because the strength of the cage holds the shelter in place.
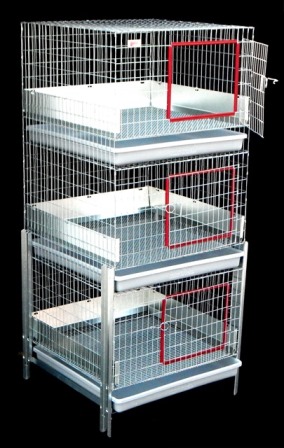
Stacking cages seem great but these trays need to be cleaned DAILY! No one ever gets this done long term, and the poop builds up in the corners and in a matter of days will build up to the level of the cage floor.
-
Housing your Rabbits

Raising rabbits can be an enjoyable and rewarding hobby or a profitable business venture, but it requires proper housing for the animals. Rabbit cages come in various sizes, materials, and designs, but not all of them are created equal. The first decision to make is weather to use hutch style cage or the all wire cage. If wire cages are to be used, we will explore the differences between the types of wire available.
Rabbit Hutches
A rabbit hutch is a wooden or metal enclosure that provides a more spacious and natural living environment for rabbits than a wire cage. Rabbit hutches typically have a solid floor and a wire mesh front and sides for ventilation and visibility. Some rabbit hutches may also have a separate sleeping area, a ramp, or multiple levels for exercise and enrichment.
Advantages of Rabbit Hutches:
- More space: Rabbit hutches usually offer more space for rabbits to move around, stretch their legs, and engage in natural behaviors such as hopping, digging, and hiding.
- Better protection: A solid floor and walls can protect rabbits from the elements, predators, and other hazards, as well as provide privacy and security.
- More natural: Rabbit hutches can provide a more natural and stimulating environment for rabbits, with access to grass, soil, and sunlight, as well as opportunities to burrow, explore, and play.
- Better for multiple rabbits: Rabbit hutches can accommodate multiple rabbits and allow them to interact with each other, which can reduce boredom and loneliness.
Disadvantages of Rabbit Hutches:
- More maintenance: Rabbit hutches require more maintenance than wire cages, as they can be harder to clean, disinfect, and dry, and require more frequent bedding changes.
- More expensive: Rabbit hutches are generally more expensive than wire cages, especially if they are made of high-quality materials or have special features.
- More difficult to move: Rabbit hutches can be heavy, bulky, and difficult to move around, especially if they are placed on uneven or soft ground.
- More difficult to observe: Rabbit hutches may not provide as clear and easy observation of rabbits as wire cages do, especially if the hutch has a solid back or is placed in a dark or secluded area.
Wire Cages
A wire cage is a metal enclosure that provides a more compact and easily accessible living environment for rabbits than a hutch. Wire cages typically have a wire mesh floor and walls for air circulation and waste removal, as well as a separate tray or pan for collecting droppings and urine. Some wire cages may also have additional features such as a water bottle, a hay rack, or a litter box.
Advantages of Wire Cages:
- Easier maintenance: Wire cages are easier to clean, disinfect, and dry than rabbit hutches, as they do not require bedding or substrate, and waste can be easily removed through the wire mesh floor or the tray.
- More affordable: Wire cages are generally less expensive than rabbit hutches, especially if they are basic and small.
- Easier to move: Wire cages are lightweight and portable, and can be easily moved around or transported, especially if they have wheels or handles.
- Easier to observe: Wire cages provide a clear and unobstructed view of rabbits from all angles, which can help monitor their health, behavior, and interaction with other rabbits.
Disadvantages of Wire Cages:
- Less space: Wire cages may not provide enough space for rabbits to exercise, play, and express their natural behaviors, especially if the cage is small or if the rabbit is confined for long periods.
- Less protection: Wire cages may not protect rabbits from extreme weather, predators, or hazards such as sharp edges or wires.
- Less natural: Wire cages may not provide enough environmental enrichment and stimulation for rabbits, as they may lack access to grass, soil, and sunlight, as well as opportunities to hide, burrow, and explore.
- Less suitable for multiple rabbits: Wire cages
Materials available for cages
When it comes to housing rabbits, it is important to choose materials that are safe, durable, and appropriate for the rabbits’ needs. Three common materials used in rabbit housing are galvanized after weld (GAW) wire, powder-coated wire, and hardware cloth. In this article, we will compare these materials and discuss their pros and cons for rabbit housing.
Galvanized After Weld (GAW) Wire GAW wire is a type of wire that is coated with a layer of zinc after being welded. This makes the wire more resistant to rust, corrosion, and other environmental factors. GAW wire is often used for rabbit housing because it is strong, durable, and can withstand chewing and scratching.
Advantages of GAW Wire:
- Resistant to rust and corrosion: GAW wire is coated with a layer of zinc that protects it from rust, corrosion, and other forms of wear and tear.
- Strong and durable: GAW wire is made of thick and sturdy wires that can withstand the weight and pressure of rabbits, as well as their chewing and scratching.
- Safe for rabbits: GAW wire does not contain harmful chemicals or toxins that can harm rabbits, and it does not emit fumes or odors that can affect their health.
Disadvantages of GAW Wire:
- More expensive: GAW wire is generally more expensive than other types of wire, especially if it is made of high-quality materials or has special features.
- Harder to cut and shape: GAW wire is thicker and tougher than other types of wire, which can make it harder to cut and shape, and may require specialized tools or equipment.
- Not as visually appealing: GAW wire may not be as visually appealing as other types of wire, as it has a rough and industrial look.
Powder-Coated Wire Powder-coated wire is a type of wire that is coated with a layer of colored powder that is baked onto the surface. This gives the wire a smooth and attractive finish that can match the decor and style of the surroundings. Powder-coated wire is often used for rabbit housing because it is aesthetically pleasing and can provide a more comfortable living environment for rabbits.
Advantages of Powder-Coated Wire:
- Visually appealing: Powder-coated wire comes in a variety of colors and finishes that can enhance the appearance of rabbit housing and match the decor and style of the surroundings.
- Smooth and comfortable: Powder-coated wire has a smooth and even surface that can be more comfortable and less abrasive for rabbits, as well as easier to clean and disinfect.
- Affordable: Powder-coated wire is generally less expensive than GAW wire, especially if it is made of basic or low-grade materials.
Disadvantages of Powder-Coated Wire:
- Prone to chipping and scratching: Powder-coated wire can be prone to chipping and scratching over time, especially if it is exposed to frequent use, abuse, or weathering, which can expose the metal underneath and cause rust or corrosion.
- Not as durable: Powder-coated wire may not be as strong or durable as GAW wire, as the coating can weaken or peel off over time, which can compromise the wire’s structural integrity and increase the risk of injury or escape.
- May contain harmful chemicals: Powder-coated wire may contain harmful chemicals or toxins that can affect rabbits’ health, especially if they chew or ingest the wire.
Hardware Cloth
Hardware cloth is a type of wire mesh that is made of thick and sturdy wires that are tightly woven together. Hardware cloth is often used for rabbit housing because it can provide a high level of security and protection against predators and other hazards.
Advantages of Hardware Cloth:
- High level of security: Hardware cloth is made of thick and sturdy wires that can withstand the weight and pressure of predators, as well as their chewing and scratching, which can protect rabbits from harm.
- Widely available: Generally for sale at every local hardware and farm store.
- Versatile: Hardware cloth can be used for a variety of purposes, such as enclosing outdoor runs, creating partitions inside rabbit housing, or reinforcing weak or damaged areas of existing cages.
- Resistant to rust and corrosion: Hardware cloth is usually made of galvanized or stainless steel, which makes it more resistant to rust, corrosion, and other forms of wear and tear.
Disadvantages of Hardware Cloth:
- Not as visually appealing: Hardware cloth may not be as visually appealing as other types of wire, as it has a utilitarian look and may not match the decor and style of the surroundings.
- More expensive: Hardware cloth is generally more expensive than other types of wire, especially if it is made of high-quality materials or has a large mesh size.
- Not as comfortable for rabbits: Hardware cloth has a rough and abrasive surface that can be uncomfortable and irritating for rabbits, especially if they have sensitive skin or feet.
In conclusion, when choosing materials for rabbit housing, it is important to consider the rabbits’ needs, as well as the advantages and disadvantages of each material. GAW wire is a strong and durable option that can withstand chewing and scratching, while powder-coated wire can provide a smooth and comfortable surface that matches the decor and style of the surroundings. Hardware cloth is a versatile and secure option that can protect rabbits from predators and other hazards, but may not be as visually appealing or comfortable for rabbits. Ultimately, the choice of material will depend on the specific needs and preferences of the rabbits and their caretakers.
Wire Source
Now, let’s discuss why galvanized after weld rabbit cages are superior to new powder-coated Chinese cages. Wherever possible, buy Made in the USA-not just for “patriotic” but for quality reasons.
First, let’s define the terms. Galvanization is a process of coating steel or iron with a layer of zinc to protect it from rust and corrosion. After-weld galvanization involves applying the zinc coating to the metal after the welding process, which ensures that the entire cage, including the welded joints, is protected. Powder coating is a method of applying a decorative and protective finish to metal surfaces by spraying dry powder onto them and then heating the coated object to fuse the powder into a smooth and durable layer.
Durability and Longevity
Galvanized after weld rabbit cages are more durable and longer-lasting than powder-coated Chinese cages. The zinc coating of galvanized cages provides excellent corrosion resistance, making them resistant to rust, weathering, and wear and tear. In contrast, powder-coated cages are prone to chipping, scratching, and fading, especially when exposed to harsh outdoor conditions or frequent use. The powder coating layer can also trap moisture and promote rust formation if it becomes damaged or cracked.
Safety and Health
Galvanized after weld rabbit cages are safer and healthier for rabbits than new powder-coated Chinese cages. The galvanization process produces a non-toxic, stable, and inert coating that does not release harmful chemicals or particles into the air or the rabbit’s environment. Powder coating, on the other hand, often contains volatile organic compounds (VOCs) that can off-gas or leach into the rabbit’s food, water, or bedding and cause respiratory, digestive, or skin problems. Powder coating can also harbor bacteria, mold, and parasites if it gets scratched or corroded, which can pose a risk of infection or disease to rabbits.
Maintenance and Cleaning
Galvanized after weld rabbit cages are easier to maintain and clean than new powder-coated Chinese cages. The smooth and hard surface of galvanized cages resists dirt, stains, and odors, making them simple to wipe, scrub, or hose down. Galvanized cages also do not require any special cleaners or solvents, as they do not react with most substances. Powder-coated cages, however, can be more difficult to clean, especially if the coating is chipped or scratched, as dirt and debris can accumulate in the crevices and seams. Powder-coated cages also need to be cleaned with mild and non-abrasive detergents to avoid damaging the coating or releasing harmful fumes.
Cost and Value
Galvanized after weld rabbit cages may cost more upfront than new powder-coated Chinese cages, but they offer better value in the long run. Galvanized cages can last for years or even decades without needing major repairs or replacements, saving you money on frequent cage replacements or repairs. Galvanized cages are also more versatile and customizable than powder-coated cages, as they can be easily modified, expanded, or adapted to your specific needs or preferences. Powder-coated cages, on the other hand, may limit your options and flexibility due to their fixed size, design, and features.
In conclusion, galvanized after weld rabbit cages are a superior choice compared to new powder-coated Chinese cages due to their durability, safety, health, maintenance, and value. If you want to ensure that your rabbits have a comfortable, secure, and healthy living environment, consider investing in a galvanized after weld rabbit cage that will stand the test of time.
Stay tuned for our next article-Cage Assembly…..
-
Breeding Show Rabbits or Meat Breeds.
I was watching some YouTube videos and was reminded of the huge difference between the goals of breeders. As I am doing my chores, looking after 11 young litters of bunnies ranging from 8 to 12 in each litter, in a herd of 15 meat breed does I was also listening to a lovely video from Grace Hollow Rabbitry. PJ of Grace Hollow is a wonderful woman and a top breeder of New Zealand’s of all colors and has been raising rabbits for 20+ years. She puts up nice videos of her herd of top quality show rabbits in Arkansas. The striking difference between the top show operations and mine were very striking and it occurred to me that new breeders should be given some information regarding the differences.
Many times I am contacted by new breeders who paid astronomical prices for rabbits of top show quality. As they are just starting out and having little or no experience, this is the biggest mistake possible. After a year or more they get either no litters, small litters, or does killing litters. Thinking they are doing something wrong or that rabbits are just not for them, they want to get out entirely. This is sad to me because enthusiastic people that could have been wonderful breeders are forced out and will likely be spoiled on rabbit breeding forever!
These people need to realize, however, it is NOT their fault! Even the most experienced breeders can barely get anything out of these fancy show animals. To be clear, I am NOT criticizing show breeders! I feel that they are just so far into it that they literally can’t even see what they are putting up with.
Grace Hollow Rabbitry Video Any new breeder needs to think about what their goals are, what their threshold for disappointment is, and how they want to run their operation. To me, the type goals of the show rabbits are structurally incompatible with high productivity. I know there can be exceptions, but just listen to the overall herd average! I have 15 adult does today, 11 have litters under two weeks of age, 4 have litters between 4 and 8 weeks of age. Smallest litter is 7, largest is 10, average is 8. YES I have 112 NZ Bunnies right now! Also 4 does are due later this week. This gives me a wide selection to chose the biggest and best for further breeding.
If I were raising show rabbits like the video depicts, if I had 15 “show does” I could expect 4 litters averaging 3 per litter (9 bunnies), 2 bred does which will not pull fur or raise babies, and 9 open does just waiting to see how they turn out. Sure there may be a real winner in that group, but what is the cost in time and feed? Is there even any return to this system? By contrast if your looking to raise meat for your table you should start with the type of rabbits which can and will produce!
Breeding rabbits for meat production has been a popular practice for centuries, providing a sustainable source of protein for human consumption. However, with the rise of the show rabbit industry, some breeders have started focusing on breeding meat rabbits for their appearance and showmanship rather than their productivity. In this article, we will compare and contrast the breeding of commercial meat rabbits versus show rabbits of meat breeds in terms of litter size, meat type, and productivity.
Litter Size
One of the main differences between breeding commercial meat rabbits and show rabbits is the desired litter size. Commercial meat rabbit breeders prioritize producing large litters with fast-growing, healthy kits that can be raised for meat production. They select for traits such as high fertility, good maternal instincts, and fast growth rates to ensure maximum productivity.
On the other hand, show rabbit breeders of meat breeds may focus on producing fewer offspring per litter, but with a higher quality of individual rabbits. They select for traits such as size, shape, and coat quality, which may not be as important for commercial meat production but are critical for success in rabbit shows.
Meat Type
Another difference between breeding commercial meat rabbits and show rabbits of meat breeds is the type of meat they produce. Commercial meat rabbits are usually bred for their lean, high-quality meat, which is typically sold in grocery stores and used in restaurants. The meat from these rabbits is often considered healthier than other meats, as it is low in fat and high in protein.
In contrast, show rabbits of meat breeds may be bred more for appearance than meat quality. While they may still produce meat, the focus is on the appearance of the rabbit rather than the quality of the meat. This means that the meat from show rabbits may not be as lean or high-quality as that produced by commercial meat rabbits.
Productivity
Finally, breeding commercial meat rabbits and show rabbits of meat breeds also differ in terms of productivity. Commercial meat rabbit breeders prioritize producing large numbers of rabbits in a short period of time to maximize their profits. They aim to raise rabbits that reach market weight quickly and efficiently, with minimal input of resources.
Show rabbit breeders, on the other hand, may be less concerned with productivity and more focused on breeding rabbits that excel in rabbit shows. They may spend more time and resources on grooming and caring for individual rabbits, which can limit the number of rabbits they are able to produce.
Conclusion
In conclusion, while both commercial meat rabbit breeding and show rabbit breeding of meat breeds involve breeding rabbits for their meat, there are significant differences between the two practices. Commercial meat rabbit breeders prioritize producing large litters of fast-growing, healthy rabbits with lean meat. Show rabbit breeders of meat breeds may focus on producing fewer offspring per litter but with higher quality individual rabbits that are groomed for appearance in rabbit shows. Ultimately, the breeding approach will depend on the goals and priorities of the individual breeder.
The way to go if your looking to show is to buy a nice buck and line-breed his daughters back to him. I never recommend purchasing does from show lines as the chances you will get anything out of them is slim at best. If they are good producers they would not be selling.
-
Now Selling Rabbit Fertilizer with BioChar! $5/gallon

Biochar is a type of charcoal that is created through a process called pyrolysis, which involves heating organic material in the absence of oxygen. Biochar has many advantages and benefits for soil health and plant growth. Here are some of the main advantages of biochar:
- Increases soil fertility – Biochar is a highly porous material that can hold onto nutrients and water, making them available to plants over a longer period of time. It also helps to retain other organic matter in the soil, which can improve soil fertility.
- Improves soil structure – Biochar helps to improve soil structure by reducing soil compaction and increasing soil porosity. This allows water and air to move more easily through the soil, which can benefit plant roots and the microbial life in the soil.
- Promotes beneficial microbial activity – Biochar can provide a habitat for beneficial microorganisms in the soil, such as mycorrhizal fungi and other beneficial bacteria. This can help to improve soil health and nutrient cycling.
- Reduces greenhouse gas emissions – Biochar production can help to reduce greenhouse gas emissions, as it captures and stores carbon that would otherwise be released into the atmosphere through the decomposition of organic matter.
- Improves water quality – Biochar can help to reduce nutrient runoff and leaching from soil, which can improve water quality and reduce the risk of nutrient pollution in nearby waterways.
- Increases plant growth and yield – Biochar can increase plant growth and yield by improving soil fertility, structure, and microbial activity. Studies have shown that plants grown in soil amended with biochar can produce higher yields and have better resistance to stress.
- Helps to mitigate climate change – Biochar production can also help to mitigate climate change, as it can be used to sequester carbon from the atmosphere for hundreds or even thousands of years. This means that the carbon stored in biochar remains in the soil, rather than being released back into the atmosphere through decomposition.
- Reduces the need for synthetic fertilizers – By improving soil fertility and nutrient retention, biochar can reduce the need for synthetic fertilizers in agriculture. This can help to reduce the environmental impact of conventional farming practices and promote more sustainable methods of food production.
- Helps to remediate contaminated soils – Biochar can also be used to remediate contaminated soils by adsorbing pollutants and heavy metals. This can help to reduce the risk of environmental contamination and promote the restoration of degraded land.
- Supports sustainable agriculture – By promoting soil health and reducing the environmental impact of agriculture, biochar can help to support more sustainable methods of food production. This can help to improve food security and promote a more resilient and sustainable agricultural system.
In conclusion, biochar has many advantages for soil health and plant growth. It can improve soil fertility, structure, and microbial activity, reduce greenhouse gas emissions, and improve water quality. By incorporating biochar into your garden soil, you can reap the benefits of this valuable soil amendment and promote a more sustainable and healthy growing environment.
Making Rabbit BioChar

Although making rabbit biochar with a barrel is a simple it is very time consuming. Here are the steps to make rabbit biochar with a barrel in case you want to try your hand at making the worlds best soil amendment yourself:
- Choose a barrel – Choose a metal barrel with a lid that can be tightly sealed. A 55-gallon drum is a good size for making biochar.
- Drill holes in the barrel – Use a drill to make several holes in the bottom of the barrel. These holes will allow air to flow into the barrel during the biochar-making process.
- Load the barrel – Add a layer of dry, organic material to the bottom of the barrel, such as wood chips, straw, or dried leaves. Then add a layer of rabbit manure on top. Repeat this layering process until the barrel is about three-quarters full.
- Light the barrel – Light a small fire inside the barrel using kindling or newspaper. This will ignite the organic material and begin the process of pyrolysis.
- Seal the barrel – Once the fire has ignited, quickly put the lid on the barrel and seal it tightly. This will prevent oxygen from entering the barrel, which is necessary for the biochar-making process.
- Monitor the temperature – Use a thermometer to monitor the temperature inside the barrel. You want the temperature to reach around 500°C (932°F), but no higher. If the temperature gets too high, the biochar will turn to ash.
- Allow the barrel to cool – Once the temperature has stabilized, allow the barrel to cool completely before opening it. This can take several hours.
- Remove the biochar – Once the barrel has cooled, remove the lid and scoop out the biochar. It will be black and brittle, with a porous texture.
- Crush the biochar – Crush the biochar into smaller pieces using a hammer or other heavy object. This will make it easier to incorporate into your soil.
- Add to soil or compost – Add the biochar to your soil or compost, mixing it in well. The biochar will improve soil fertility, structure, and water retention, and help to support beneficial microbial activity.
Overall, making rabbit biochar with a barrel is a simple and effective way to produce a valuable soil amendment using common materials. Just be sure to take proper safety precautions when working with fire and hot materials, and monitor the temperature carefully to ensure a high-quality biochar product.